
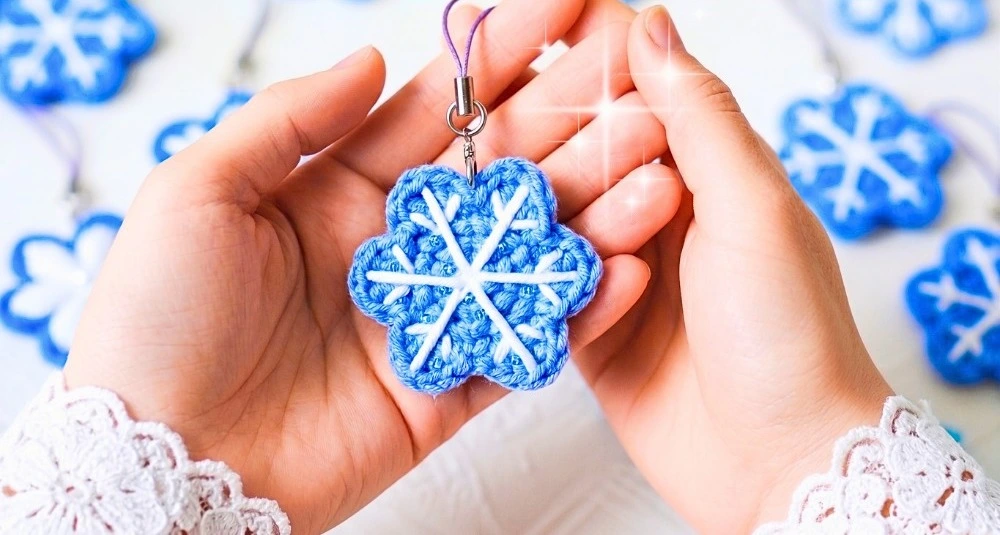
A delicate crochet snowflake can capture the beauty of winter in every stitch. This elegant handmade piece blends timeless seasonal charm with a lightweight design that looks stunning on Christmas trees, holiday tables, gift packages or festive displays. Its intricate appearance makes a beautiful decorative accent, and it is enjoyable to make, too. Handmade winter decorations never lose their appeal, and this crochet snowflake is a wonderful choice for festive decorating. The finished item can stand on its own, join others to form a beautiful garland, or work as a decorative accent for thoughtful gifts. Its beginner-friendly design also leaves plenty of room to experiment. Credit: Tiny Crochet Lab.
What you’ll need
- Base yarn: light blue (or your choice of main snowflake color) cotton yarn
- Embroidery yarn: white yarn or thread for embroidering the snowflake rays
- Crochet hook: 2.0 mm – 2.5 mm (choose the size that matches your yarn)
- Tapestry / darning needle: for weaving in yarn ends and embroidering the white star detail
- Scissors: for trimming yarn tails
- Optional hardware (for a charm): jump ring, phone strap cord, or keychain ring
Finished Size
Approximately 4.5 cm – 5 cm (1.8 – 2.0 inches) in diameter when using fine cotton yarn.
Customization Ideas
- Colors: instead of light blue, try pastel pink — different colors give different winter looks
- Glitter / metallic thread: hold a thin silver or iridescent metallic thread together with the white embroidery yarn for a sparkly holiday look
- Uses: attach a phone strap cord to turn it into a bag charm or keychain; add a string loop to make a Christmas tree ornament; crochet several snowflakes and string them together for a winter garland
Pattern Notes
- Rounds 1–3: form a flat circular base using standard single crochet increases
- Round 4: creates the 6 points of the snowflake using advanced stitches (hdc, dc, tr)
- Total stitch counts for each round are shown in parentheses at the end of the round instructions
Pattern Abbreviations & US Terminology
- sc: Single Crochet
- inc: Single Crochet Increase (2 sc in the same stitch)
- hdc: Half Double Crochet
- dc: Double Crochet
- tr: Treble (Triple) Crochet
- sl st / sl: Slip Stitch
- st(s): Stitch(es)
- [ ] × 6: Repeat the sequence inside the brackets 6 times
Tips Before You Start
- Tight tension: keep tension neat and even so the snowflake’s points stay crisp and defined without curling
- Embroidery placement: embroider the white star detail on the front side before adding hardware or sewing to a backing piece
- Blocking (optional): lightly steam or wet-block the snowflake if the points cup slightly
 Save
1. Crochet Snowflake Charm
Work the base motif in light blue yarn, then add the white embroidered star over the top. The charm is small and quick — a perfect stash-buster — and the same base can be made in any color for different winter looks.
Video tutorial: the step-by-step snowflake charm tutorial
Tip: work the embroidery with the snowflake lying flat and the points gently stretched out — it keeps the star arms straight and even.
Base Motif (Light Blue Yarn)
Round 1: Center Ring
Stitch count: 6 sc
- Create a magic ring (MR)
- Work 6 single crochets (sc) into the magic ring
- Pull the tail tight to close the center hole
Round 2: Center Expansion
- Work 1 increase (2 sc in same stitch) into each of the 6 stitches around. Stitch count: 12 sc (6 increases)
Round 3: Flat Base Outer Ring
Sequence: (sc, inc) × 6. Stitch count: 18 sc
- Repeat the following sequence 6 times around: work 1 sc in the next stitch
- Work 1 increase (2 sc in the next stitch)
Round 4: Snowflake Points
Round 4 creates 6 snowflake points across the 18 stitches from Round 3 (3 base stitches per point). Stitch count: 6 points around the perimeter.
Formula for full Round 4: [(sl st, hdc in 1st st), (dc, tr, dc in 2nd st), (hdc, sl st in 3rd st)] × 6
- Repeat the following 3-stitch sequence 6 times: Stitch 1: work 1 slip stitch (sl st) and 1 half-double crochet (hdc) into the first stitch
- Stitch 2: work 1 double crochet (dc), 1 treble crochet (tr), and 1 dc into the second stitch
- Stitch 3: work 1 hdc and 1 sl st into the third stitch
Fastening Off & Finishing Edge
- Slip stitch to the starting stitch of Round 4
- Cut yarn, leaving a 4–5 inch tail, and pull through
- Thread the tail onto a tapestry needle and weave through the back loops to secure
Final Assembly
1. Snowflake Surface Embroidery
- Thread a needle with white yarn or thick white embroidery floss
- Bring the needle up through the center magic ring from the back
- Insert the needle down into the top peak (treble stitch) of one snowflake point to create a straight white ray
- Repeat this process for all 6 points, forming a 6-arm white star pattern over the light blue base
- Secure white yarn ends firmly on the reverse side and trim excess yarn
2. Hardware / Hanging Loop Attachment
- Open a small jump ring using pliers
- Insert the jump ring through the top treble stitch of one of the 6 points
- Attach a phone strap cord or key ring onto the jump ring
- Pinch the jump ring closed
Your handmade crochet snowflake charm is now complete! These quick-to-make motifs are ideal stash-busters and make thoughtful gifts, tree decorations, or wearable charms. The snowflake charm idea is inspired by diycrafts.life. Happy winter crocheting!
Sources: project inspiration from diycrafts.life and Tiny Crochet Lab. All descriptions are original; pattern and video credit belongs to the linked creators.
