
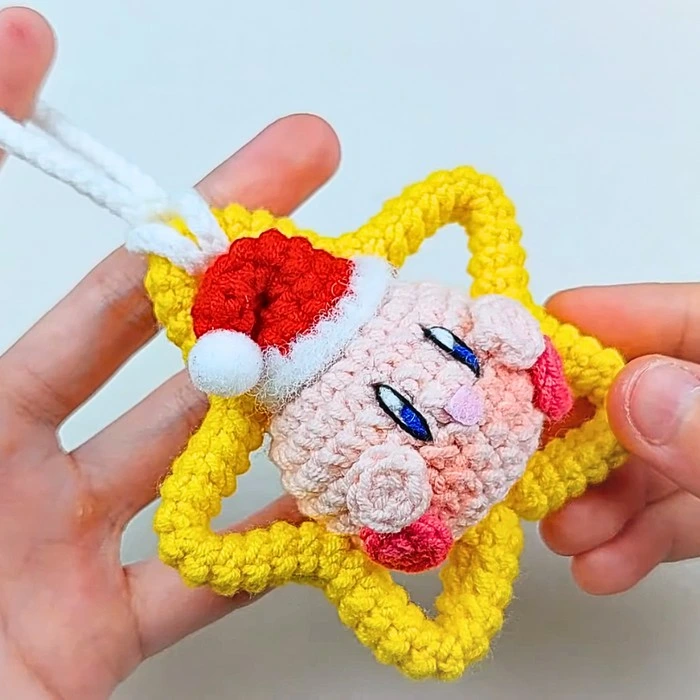
There’s nothing quite like a handmade ornament to make the Christmas tree feel personal — and this little Kirby brings the fun. This fan-made amigurumi project is a palm-sized pink Kirby dressed for the holidays: a yellow star frame wrapped around his round body, a tiny red Santa hat with a fluffy white trim, and a white strap so he hangs right on the tree. It’s cheerful, lightweight, and makes a lovely handmade gift for any Kirby fan.
One honest note before we start: Kirby is a Nintendo character, so this is an unofficial fan project meant for personal use — not affiliated with or endorsed by Nintendo. The design and video walkthrough below belong to their original maker, and I’ve linked them for you.
What you’ll need
- Baby yarn in pink, dark pink/red, yellow, blue, black, and white (the tutorial notes yarn codes 43, 8, 63, and 9)
- Fuzzy white Candy Cotton yarn (code 1) for the Santa hat trim — regular white yarn works as a substitute
- 2.0 mm crochet hook
- Thread clippers or scissors, embroidery needles, and a stitch marker
- Fiberfill stuffing
- A small piece of pink felt for the cheeks
How to Crochet an Adorable Kirby Christmas for Décor
 Save
1. Kirby Christmas Ornament — Star Frame & Santa Hat

Everything about this project builds toward one finished ornament, and the pieces come together in a satisfying order. Here’s the sequence, following the original maker’s tutorial:
Start with the star frame tube. The yellow star isn’t crocheted flat — it begins as a long, narrow tube: a 6-stitch magic ring, then 65 rounds of 6 single crochets. Fasten off with a long tail (don’t trim it — you’ll need it for sewing the points later) and set the tube aside while you build Kirby.
Crochet Kirby’s body. Work from a 6-stitch magic ring, increasing steadily out to 30 stitches, holding a few rounds, then decreasing back down through the rounds until you’re left with 12 stitches. Stuff the body firmly with fiberfill at this point so the round shape holds, then close with a final decrease round and cinch the last 6 stitches shut.
Add the little hands and legs. The hands are simple 6-stitch magic ring rounds worked in the specified color; the legs are 8-stitch rounds in dark pink/red. Sew the hands to the sides of the body around Round 6, and attach the legs at the bottom, angled slightly outward for Kirby’s classic cheerful stance. Pinned placement before sewing makes the symmetry much easier.
Embroider the face. The eyes are embroidered, not crocheted — tall ovals with dark blue at the top, black at the bottom, and tiny white highlight lines stitched in. Cut two small ovals from pink felt and glue them just below and slightly outside the eyes for the cheeks.
Crochet the Santa hat. Begin with a 4-stitch magic ring in red and increase gradually round by round until the hat reaches 16 stitches. Switch to the fuzzy white yarn for the final trim round to get that fluffy edge, add a tiny white pom-pom (crocheted or store-bought) to the tip, stuff the hat lightly, and sew or glue it onto the top of the head.
Turn the tube into a star. Fold the long yellow tube into five distinct points around Kirby, using that long sewing tail to secure each fold, then wrap the finished star frame around the body with a few anchoring stitches.
Finish with the strap. Chain 50 in white (adjust the length to taste), join into a loop with slip stitches back down the chain, and thread it through the top point of the star. Your ornament is ready to hang.
Video tutorial: Nhi Art Handmade – Lem’n Do’s step-by-step Kirby Christmas tutorial
Tip: don’t trim the star tube’s long tail when you finish it — that tail is what you’ll sew the five points with. And pin the arms and legs in place before stitching so the symmetry sits right.
Caring for your Kirby Christmas ornament
- Dust, don’t wash: a soft brush or lint roller keeps the yarn fresh without distorting the shape.
- Spot clean only: dab with a damp cloth and mild soap if needed, then air dry.
- Keep out of strong sun: the bright pink and red yarns fade faster in direct light.
- Store flat between seasons: tuck it in a breathable cotton bag with the strap looped loosely so it doesn’t kink.
- Stuff firmly at the start: a well-packed body keeps its round shape year after year.
- Hang away from candles and pets: amigurumi and open flames don’t mix, and tiny felt cheeks are tempting to curious paws.
Design credit: pattern and written walkthrough by diycrafts.life, with the step-by-step video tutorial by Nhi Art Handmade – Lem’n Do on YouTube. I only wrote this roundup — the pattern itself belongs to its maker, so please watch their video and give their channel a follow when you make yours. One ornament takes an evening; by the weekend you’ll have a little galaxy of pink puffs ready for the tree. Happy crocheting!
