
Some Christmas decorations earn their place by being big and sparkly — this one does it by being small, soft, and endlessly rearrangeable. The garland is built from individual crocheted stars, each only about 3.5 inches across, worked in three quick rounds and then strung along a separate crocheted cord. Because the stars and the strand are made independently, you decide everything at assembly time: how many stars, which colors, how far apart they sit, and how long the finished garland runs. Drape it along a mantel, frame a window, wind it through the tree, or loop it over a holiday display shelf. This project follows the star garland pattern published by diycrafts.life (credited there to Poplar Crochet), rewritten here in my own words, with their exact video tutorial linked below.
What you’ll need
- Soft acrylic yarn in festive colors for the stars — the original uses pastel pink and light blue; classic red, green, and white or a sparkly metallic yarn work just as well
- Light gray or another contrasting yarn for the hanging strand
- 3.0 mm crochet hook for the stars
- 4.0 mm crochet hook for the hanging strand and assembly
- Tapestry needle
- Scissors
 Save
1. Festive Star Garland
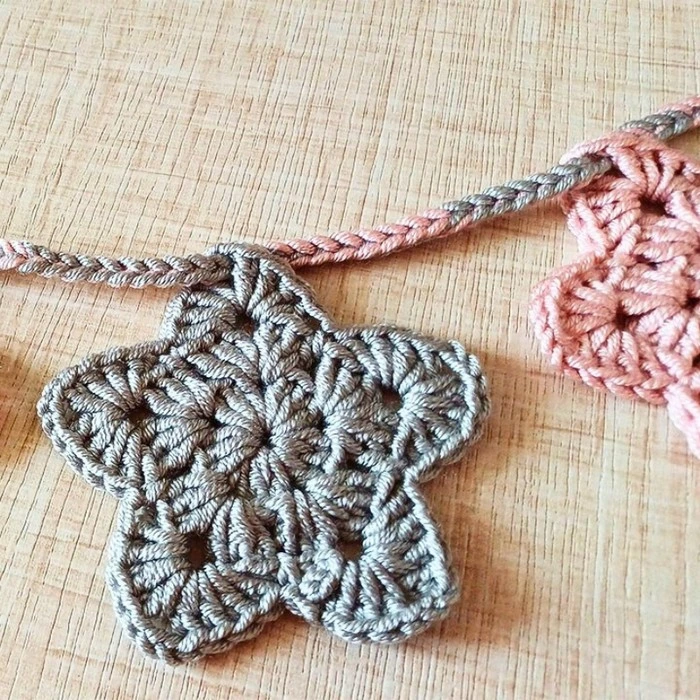
Every star starts the same way: chain 5 and join with a slip stitch to close a small center ring. Keep that joining stitch snug but don’t strangle the ring — all of Round 1 is worked into its center, and a twisted or pinched ring makes the first round fiddly. Round 1 builds six groups around the ring: chain 3 (this counts as your first double crochet), work 2 more double crochet into the ring, then repeat (chain 1, 3 double crochet into the ring) five times. Join to the top of the starting chain-3, then slip stitch across the next 2 stitches so your yarn lands inside the first chain-1 space. Count before you move on: six groups of three, six chain-1 spaces. Those spaces do all the shaping work in the next round.
Round 2 is where the circle turns into a star. Into the first chain-1 space work chain 3, 2 double crochet, chain 3, and 3 double crochet, then repeat that same (3 double crochet, chain 3, 3 double crochet) combination in four of the remaining spaces — five point loops in total, each tipped with a chain-3 space. Join, and slip stitch over to the first point loop. Round 3 sharpens the outline: in each point’s chain-3 space work chain 3, 3 double crochet, chain 3, and 4 double crochet, then place a single crochet in the dip between points before moving to the next one. That single crochet is what pulls the edge inward and gives the star its recognizable silhouette, so take care to place it in the space between points rather than into a handy nearby stitch. When the last point is done, fasten off with a short tail and weave in every end with your tapestry needle. Check that the star lies flat, then set it aside and make the rest of your batch — assembly goes much better when all the stars exist first and you can lay them out and count what your space actually needs.
For the strand, switch to the 4.0 mm hook and your contrasting yarn. Start with a slip knot and chain as long a tail as you want for hanging — this first stretch of chain is the empty end section, so size it to your display. Then chain (or slip stitch) across the gap you want before the first star, attach the star securely to the cord, and keep alternating gaps and stars down the line. Use the first gap as your measuring guide for all the others: even spacing reads neat and balanced, while deliberately varied gaps give a more relaxed, swag-like drape. Finish with a final chain tail the same length as the first, fasten off, and trim. Before hanging, lay the whole garland flat and give it a once-over — stars facing outward, spacing looking intentional, and both ends long enough for how you plan to hang it. Want a longer garland next year? Just crochet more stars and a longer cord; nothing about the pattern changes.
Video tutorial: Poplar Crochet’s “How to Crochet a Star Garland for Christmas” — the video tutorial embedded in the source pattern
Tip: work one test star and measure it before batching — if your tension runs loose or tight, adjust the hook size so your stars land near 3.5 inches and match each other on the strand.
Caring for your star garland
- Store it loosely coiled or hung, not folded: Sharp folds set creases in the stars and kink the cord; a gentle coil in a box or a hook on the closet wall keeps the shape.
- Flatten curling stars with a spritz: If a star cups or curls after storage, mist it lightly with water, lay it flat, and let it dry before hanging.
- Keep it away from heat: Acrylic yarn softens and can melt near open flames, candles, and hot fireplace mantels — admire it from a safe distance.
- Dust, don’t wash: A dry cloth or a soft brush at the start of the season is plenty; machine washing can stretch the cord and tangle the stars.
- Check the attachments yearly: The stars take the handling, so re-secure any that have worked loose on the strand before the garland goes back up.
Three rounds a star, one long chain, and a free evening — that’s the whole recipe. Make a short strand for a doorway this year, and you’ll be adding stars to it every December. Happy crocheting!
Source credit: this project follows the “How To Crochet A Festive Star Garland For Christmas Decoration” pattern by diycrafts.life, credited there to Poplar Crochet. All descriptions above are my own; the video linked above is the exact video embedded in their article.
